
In September 2019, I published my very first pattern.
My feelings of satisfaction and pride only grew as the comments started coming in. Comments from people who weren’t my mom (even though, yes, she was definitely in there too).
My husband was also proud.
So proud that, after sharing it with his coworkers, he even scrolled around my page on Instagram, an app he had repeatedly disavowed despite me showing him multiple posts by the National Park Service (and if you don’t understand why this is a selling point, go look NOW—you can thank me later).
That day when he came home from work, he asked me to make him something.
Maybe it’s because I don’t make clothing beyond hats (and even that’s a stretch for me), or maybe it’s because a bunch of stuffed animals sticking out of his pockets wouldn’t exactly complement his Mad Men-esque attire, but he has NEVER asked me to make anything for him.
So, needless to say, I was excited.
“Sure! What do you want?”
“A business man. In a suit. He can sit on my desk at work!”
… I shouldn’t have been shocked by his reply.
“Okay…” I said, while actually thinking something more like, “A person?! Ugh, I HATE making people and their tiny, little arms. I don’t want to make tiny arms!”
So, after a few days of plotting, I asked him, “What’s your favorite silly animal?”
These kind of questions are the norm in our household, so he was none the wiser to the devious plan hatching inside my head.
“A platypus,” he responded after some thought, “They just look so perfectly strange.”
YES, that was the exact answer I was hoping for!
But I played it cool.
“Oh yeah? That is a silly animal. You know, I was thinking… what if, instead of a business man, I made you a business platypus?”
He laughed and agreed to my proposal—but only on one condition: he had to have a bow tie.
I agreed to his bow tie request and upped the ante.
He had to have a top hat, too.
So, there you have it: a business platypus, comfortably making its home in my husband’s office, waiting next to his phone for the next call from a VIP (Very Important Platypus, of course).
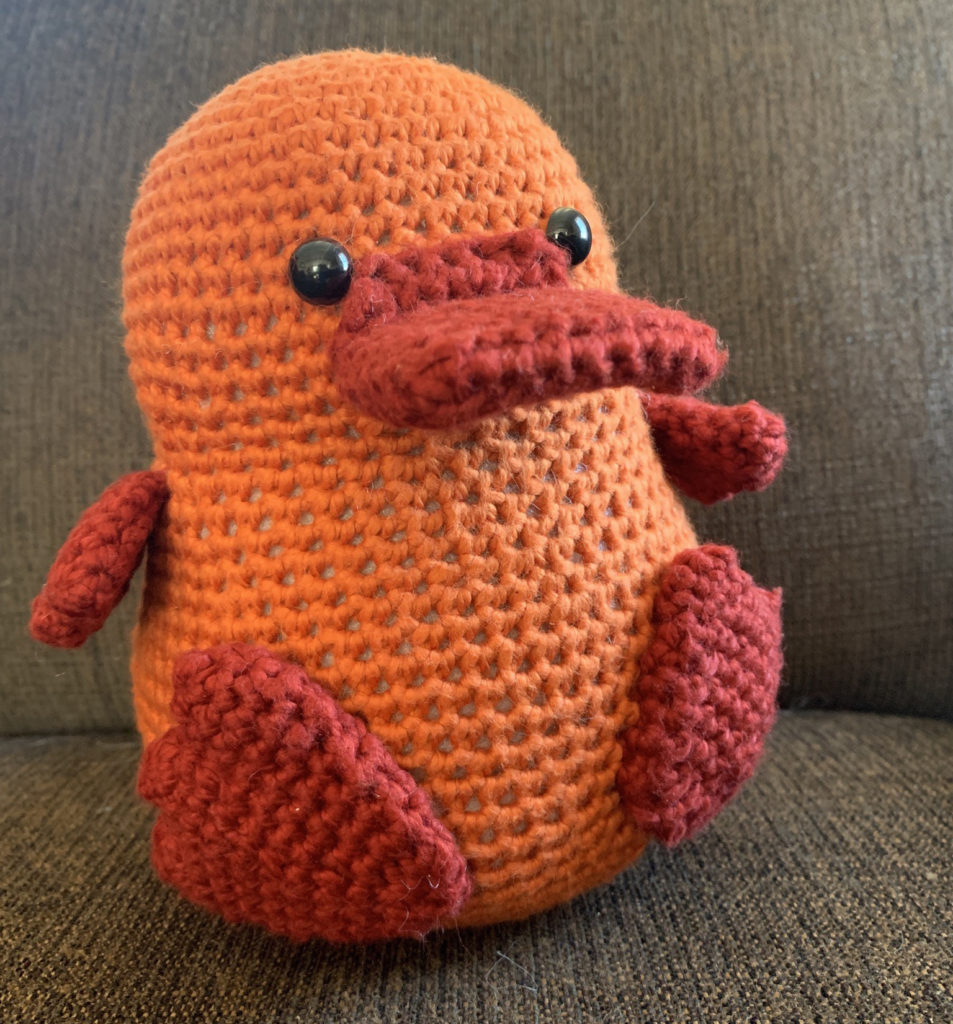
Perry the Platypus
level: easy
Materials
Yarn A
Yarn B
4 mm hook
12 mm eyes
Finishing Needles
Stuffing
Small piece of cardboard
Terms (US)
SC Single Crochet
MR Magic Ring
INC increase
DEC Single Crochet two together
SS Slip Stitch
FLO front loop only
CH chain
Body
In color A
Round 1: SC 6 in MR (6)
Round 2: INC in each (12)
Round 3: (INC, 1 SC) repeat 6 times (18)
Round 4: (INC, 2 SC) repeat 6 times (24)
Round 5: (INC, 3 SC) repeat 6 times (30)
Round 6: (INC, 4 SC) repeat 6 times (36)
Round 7: (INC, 5 SC) repeat 6 times (42)
Round 8: (INC, 6 SC) repeat 6 times (48)
Round 9-16: SC in each (48)
Insert eyes between rounds 12 and 13 with 6 stitches in between
Round 17: (DEC, 6 SC) repeat 6 times (42)
Round 18: (DEC, 5 SC) repeat 6 times (36)
Round 19: SC in each (36)
Round 20: (INC, 5 SC) repeat 6 times (42)
Round 21: SC in each (42)
Round 22: (INC, 6 SC) repeat 6 times (48)
Round 23: SC in each (48)
Round 24: (INC, 7 SC) repeat 6 times (54)
Round 25: SC in each (54)
Round 26: (INC, 8 SC) repeat 6 times (60)
Round 27- 34: SC in each (60)
Round 35: (DEC, 8 SC) repeat 6 times (54)
Round 36: (DEC, 7 SC) repeat 6 times (48)
Stuff and continue stuff until the end
Round 37: (DEC, 6 SC) repeat 6 times (42)
Round 38: (DEC, 5 SC) repeat 6 times (36)
Round 39: (DEC, 4 SC) repeat 6 times (30)
Round 40: (DEC, 3 SC) repeat 6 times (24)
Round 41: (DEC, 2 SC) repeat 6 times (18)
Round 42: (DEC, 1 SC) repeat 6 times (12)
Round 43: (DEC) repeat 6 times (6)
Fasten off
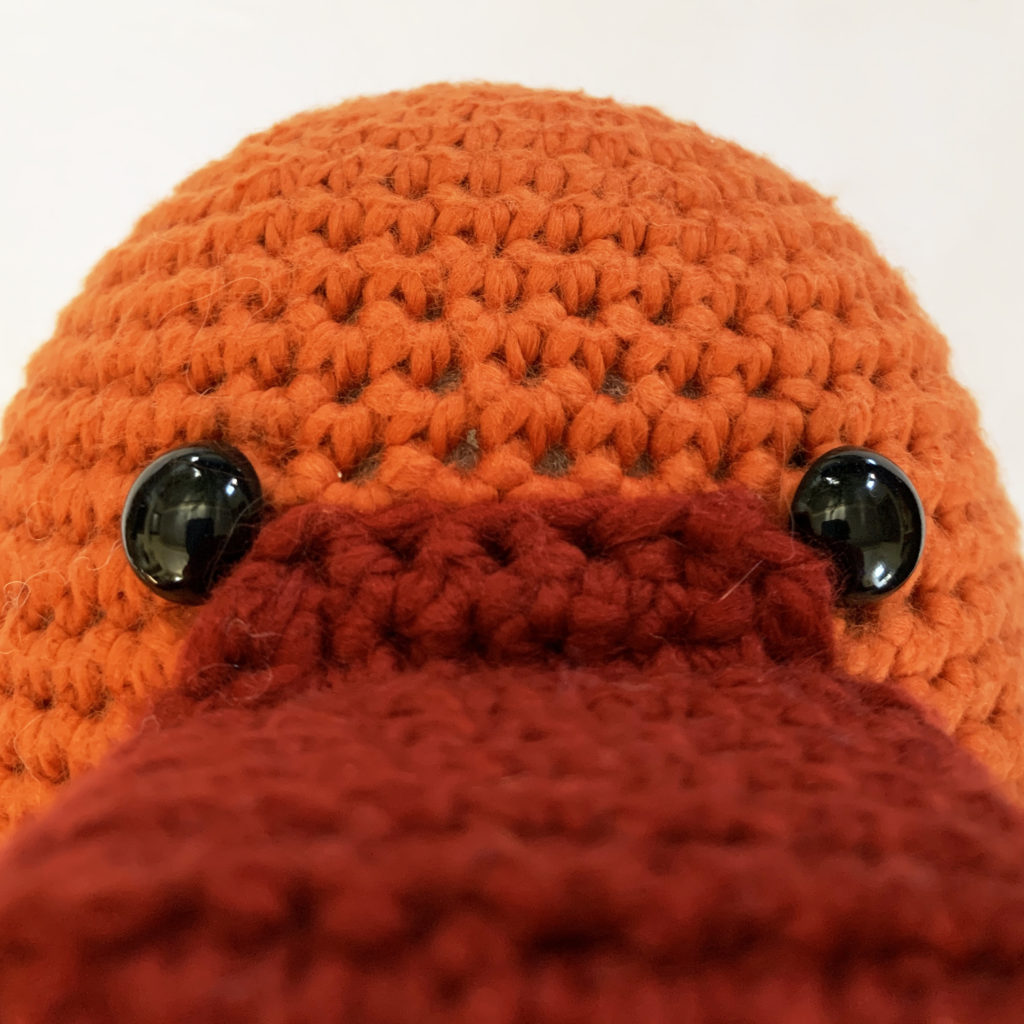
Bill
In color B
CH 10
Round 1: SC in second stitch from hook, 8 SC, 3 SC in next stitch, down the other side 7 SC, 3 SC in last stitch (22)
Round 2-7: SC in each (22)
Work the rest in row
Row 8: (FLO) CH 1, DEC, 6 SC, DEC, turn (8)
Row 9: CH 1, 2 DEC , 2 SC, 2 DEC (6)
Fasten off, leave long tail for sewing
Do not stuff
Insert cardboard in bill and sew closed.
Attach to head with row 9 in between the eyes.
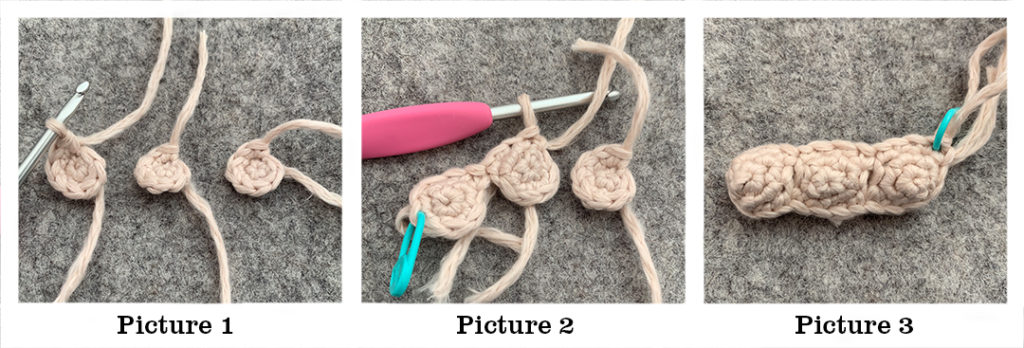
Picture 1: Make 3 toes
Picture 2: Attach toes to each other, make sure you are not putting two stitches in any of the SC, this is very easy to do accidently.
Picture 3: All toes attached
Feet
Make 2 in color B
Part one, toes: make 3
Round 1: SC 4 in MR (4)
Round 2: INC in each (8)
Fasten off 2, do not fasten off the 3rd.
Part two: on 3rd toe
Round 3: SC in 4, attach second toe, SC 4, attach third toe, SC 16 (24)
Round 4-5: SC in each (24)
Round 6: (DEC, 4 SC) Repeat 4 times (20)
Round 7: (DEC, 3 SC) Repeat 4 times (16)
Round 8: SC in each (16)
Round 9: (DEC, 2 SC) (12)
Round 10: SC in each (12)
Round 11: (DEC) Repeat 6 times (6)
Hands
Make 2 in color B
Part one, fingers: make 3
Round 1: MR 4, SS into first stitch (4)
Fasten off first two, do not fasten off the 3rd
Part two, on 3rd finger
Round 2: SC 2, attach 2nd finger, 2 SC, attach 3rd, SC 8 (12)
Round 3: SC in each (12)
Round 4: (DEC, 4 SC) Repeat 2 times (10)
Round 5: (DEC, 3 SC) Repeat 2 times (8)
Round 6: (DEC, 2 SC) Repeat 2 times (6)
Fasten off, leave long tail for sewing
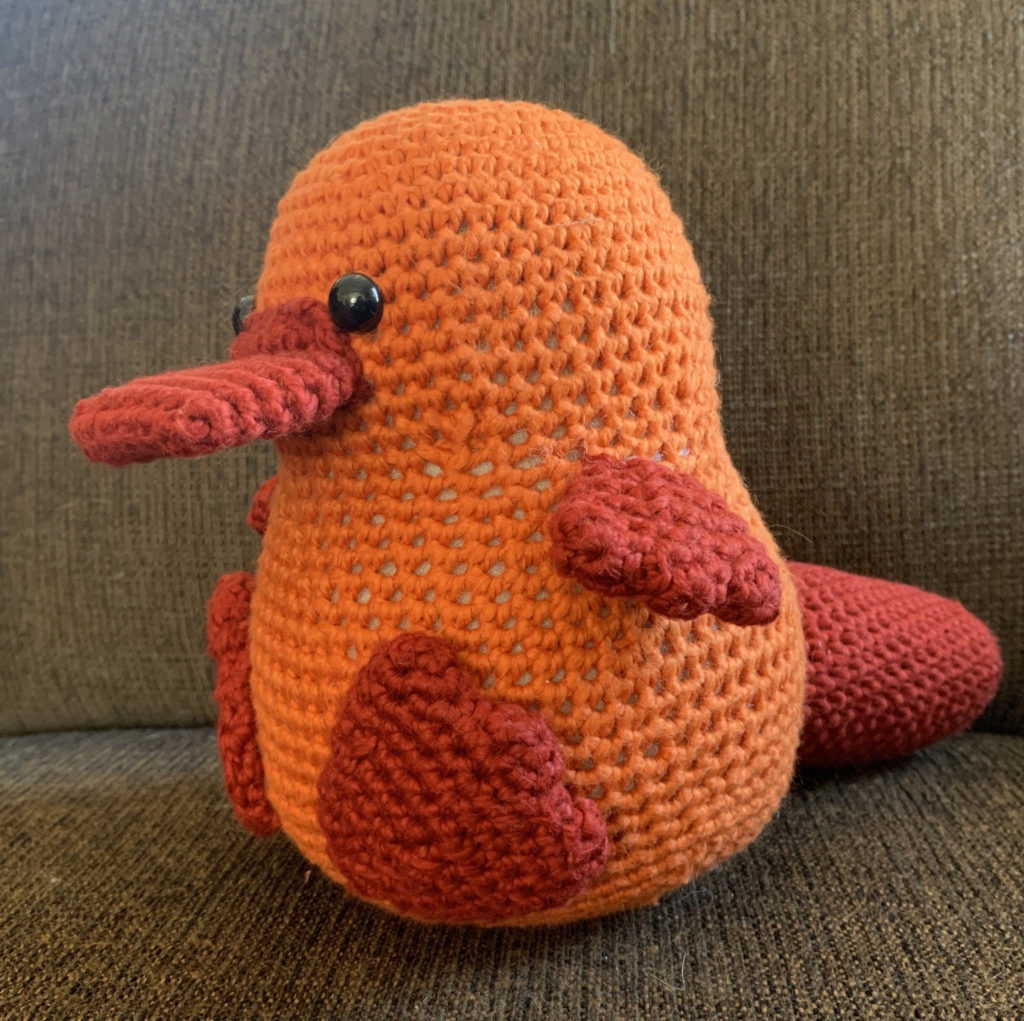
Tail
In color B
CH 10
Round 1: SK first CH, 8 SC, 3 SC in last stitch, 8 SC, 3 SC in last stich (22)
Round 2: 10 SC, INC, 10 SC, INC (24)
Round 3: 11 SC, INC, 11 SC, INC (26)
Round 4-18: SC in each (26)
Assembly
Feet:
Sewing only through the back layer of the foot, attach the feet with the bottom edge along round 34 and up to round 27- don’t sew the toes down, only the main part of the foot.
Hands:
Attach hand at a slight angle between rounds 19 and 20 at the side of the body. Only sew the end of the hand down.
Tail:
Attach so the tail makes an oval between rounds 28 and 34, stuffing as you go.
I would love to see the platypus in all his splendour, do you have the patterns for the full platypus in business wear?
Thank you for your interest, I do plan to write them up and I’ll add them when I do!